Captions
How to create captions for photos:
Photo captions can be created using a pre-defined caption style.


- First add your photo to your page.
- Next hover your mouse over the image and click on it once.
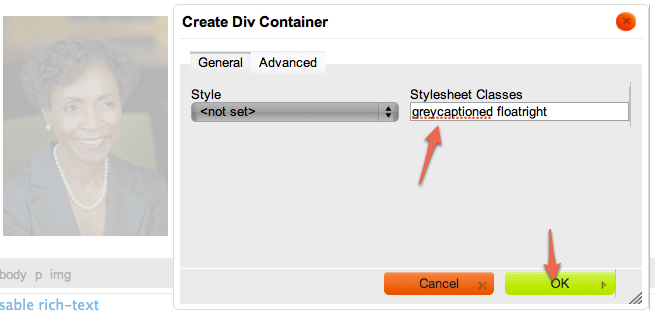
- Once you have clicked on the image, click the div button in the editor toolbar.
- In the resulting popup window, give it a stylesheet class of "greycaptioned". If you would like the image to be floated to the right or left, you can also type in "floatright" or "floatleft".
Although you will need to add your caption text in the Source view your image will be surround in a grey box div and floated in the direction you indicate.
To add a caption:
1. Click the Source button

2. Code similar to this will appear:
<div class="greycaptioned">

<p><img alt="alt text" src="/sites/yoursite.drupal.ku.edu/files/images/general/my_image.JPG" style="width: 180px; height: 225px;" /></p>

</div>
3. Below the line similar to this:
<p><img alt="alt text" src="/sites/yoursite.drupal.ku.edu/files/images/general/my_image.JPG" style="width: 180px; height: 225px;" /></p>
add this code,
<p class="rtecenter">Caption</p>
replacing the word Caption with your caption text.
4. The resulting code will be similar to this:
<div class="greycaptioned">

<p><img alt="alt text" src="/sites/yoursite.drupal.ku.edu/files/images/general/my_image.JPG" style="width: 180px; height: 225px;" /></p>

<p class="rtecenter">Caption</p>

</div>
5. OPTIONAL: Click the Source button again to return to the WYSIWYG view.
6. Publish the page.

Caption